3Delight for Houdini 19
- Dec 24, 2021
- 11 min read
Updated: Feb 18, 2022

Check out their website 3delight.com It's not a lie, 3delight is refreshingly simple and fast.

I've been using 3Delight at Soho since day 1, almost 2 decades of rendering feature film quality visual effects . It used to be a renderman compliant rendering engine and you needed developers to get it up and running. Some major overhauling has been done over the past few years and it is now my favourite rendering engine for home use (even more so than Karma).
Before going any further, let's learn to say the name properly. It's not Three Dee delight. You simply say Three Delight.
I'll break up this guide in 2 parts. First: Short section to get 3delight up and running. Second: Multi part guide to Render in Houdini. This guide is ideal for someone who already understands lighting and rendering fundamentals. If you already have some experience with a PBR Renderer such as Arnold, V-Ray, Mantra, then this guide is for you.
Get 3delight up and running
Sign up on their website and download the latest version for your OS
The Free 3delight version is the beta version and it might have some bugs. It's a good idea to join the discord group. At the time of my install, using the latest version made houdini crash.

Once you've downloaded the package for your OS, uncompress it and actually read the README.txt the install info will be there for your specific OS
Assuming you've managed to install everything properly. Run the code below on the terminal or console (windows) and it will show what version of 3delight you have.
renderdl -vmy version looks like this:
jorge@yeongwol:~$ renderdl -v
renderdl version 2.7.1 linux64 (Nov 24 2021, 7343db) "Re-Animator".
Copyright (c) 2021 Illumination Research
Compiled with clang 13.0.0 , built against glibc 2.17 and running with 2.34
Try opening idisplay:
i-displayI display is 3delight's viewer and image inspector. If you are rendering from a local machine or the cloud, your renders can be sent to idisplay.

Remember earlier, I told you to sign in? Your login info goes here

Click on the top right corner button to open up the stats panel (if it's not already open)

Click on Processing. The default should be using your computer at full capactiy. You can choose to render on the 3delight Cloud.
For test renders you should probably just render locally. However if you are impatient like me, then you will likely use the cloud rendering.

3Delight will give each new user a license to use up to 12 cores locally and 1000 minutes on the cloud.
Choosing Ludicrous Speed to test render your sequence will eat up your free 1000 minutes very quickly. Use it sparingly and stick to Econo Speed for the most part.
Almost done the first part.
Let's benchmark your machine. Follow the instructions here.
Too much info you don't care about? Ok, fine here's the direct link for the test files:
A good one to test is the Camino del Sol example.
Download the NSI example and unzip it somewhere in your local drive.
Open a terminal and type renderdl -h, this will show you the different flags you can use to render from the terminal. It's good to print the help file since the flags might change over time.
renderdl -hUsage: renderdl [options] [file1 ... fileN]
-cloud : use 3Delight Cloud to render the specified files
-collective name : use the given 3Delight Collective `name` to render the files
-display : redirect all output to 3Delight Display (a.k.a i-display)
-lua : interpret input file as a LUA file.
-stats : save statistics in rendered images
-progress : print rendering progress at each bucket
-t n : launch the render using 'n' threads
-cat : output NSI to stdout
-binary : encode NSI stream in binary format
-gzip : compress NSI stream using gzip format
-callprocedurals: expand all procedurals and archives
-o filename : output NSI stream to filename instead of stdout
-q : don't print the name of files rendered
-v : output version to console
-h : output this helpIn this case I want to render the NSI file and redirect the output to idisplay. In your terminal, type renderdl -display and left-click drag the nsi file you downloaded into the terminal. Looks like this for me:
jorge@yeongwol:~$ renderdl -display '/home/jorge/Downloads/camino_del_sol_NSI/camino_del_sol_v2.nsi'Below is a comparison between my workstation and the cloud render. About 14X faster on the cloud!!


Rendering with Houdini
Congrats, you made it this far.
Let's make sure 3delight auto installed the plugin into your houdini session.

Open houdini
navigate to /out (outputs)
tab search "3delight" in the node editor
your geometry containers at object level should have a 3delight tab.
disable other rendering engines such as arnold or redshift to avoid conflicts.
Save some time and follow these rules.

Before we get too far there's a few things you need to remember to minimise errors.
Only 3delight Shaders will work.
The 3 shaders you will mostly need are Principled, VDB Volume and maybe Displacement.
Geometry Shaders can only be attached at geometry or object level.
VDB Shaders can only be attached at object level.
All of Houdini's built in lights work with 3delight.
Convert Volumes to VDB.
Points and particles have a default radius, control with pscale.
Use add sop to convert points to a particle system if you want to shade at sop level.
Geometry lights can only source from object level.
You need open internet for cloud rendering.
Render some stuff from web and different types of surfaces
Let's aim to render some typical stuff that is usually required in production.
Imported assets from external library (Megascans or Polyhaven)
Geometry Cache
Particle Cache
VDB Cache (density, temperature, velocity fields)
Reflect and Refract Shading
Texture, Normal and Displacement Mapping
HDRI, Area Lights & Geometry Light
DOF and Motion Blur
Render layers and Frame Sequence
Download my example file here. Frame 1001, 1100 and 1200 cache files are provided. If you'd like to see the rest, cache it yourself.
There's a number of components in this scene file to experiment with. The list below goes from simple to more complex types of rendering.
Polyhaven Couch - imported geo, reattach textures and add displacement mapping
Megascan Rock - import with Quixel Bridge, reattach texture and 2 layer displacement mapping
Pig head dancer - Motion Blur, Subsurface Scattering, Refraction, Fur
Pig head pyro - VDB Pyro
3Delight Sign - Geometry Lighting & Atmosphere
Render Settings - Samples, Test Renders, AOV's, Geometry Attributes
Cloud Rendering - Sending your frames to the cloud.
Polyhaven Couch - 3delight Principled Shader
This sofa asset was downloaded from polyhaven.com using the glTF format. You can import glTF in houdini at object level using the gltf_hierarchy node.

Usage is fairly straight forward, source in your downloaded asset and click on build scene.
Once the scene is built, you can dive inside the gltf hierarchy and you'll see a materials network and a geometry container for the asset you downloaded.
We'll need to do a little bit of network surgery to make this render with 3delight. The principled shaders it comes with is only good with Mantra or Karma.

The sofa asset comes with 2 shaders, both have textures for base color, roughness, metallic and normals.
For film and high quality renders, we dont' like normal maps. Let's swap out the normal mapping to displament mapping instead.

Tab menu into the 3delight section and drop down a Principled Shader. Don't get this confused with the built in houdini one.
Once created it should show up in the vex builder as dlPrincipled1, rename to something that makes sense.
Tab menu and make Texture Patterns, the one with a 3 icon is for 3delight. You will need a texture loader for each texture plugging into the shader.
Diffuse, Roughness, Metallic
The easiest way to connect all the textures is by pasting in a relative reference of the texture paths into each texture node.

Pay close attention to the specific channel that is being used for the roughness and metallic textures. In this case they are coming from the green and blue channels.
Connect each texture node into the appropriate channel in the dlPrincipled Shader.
Normal to Displacement Mapping
The glTF auto builder did not load all the textures properly for me. Always double check that the original shader is loading textures that exist in your disk. In this case I downloaded the .exr version of the normal map.

Normal maps are vectors, they have 3 colors. If you're not sure, open the normal map in an image viewer and check. This means that we need to connect the normal map as a vector displacement to use it properly.
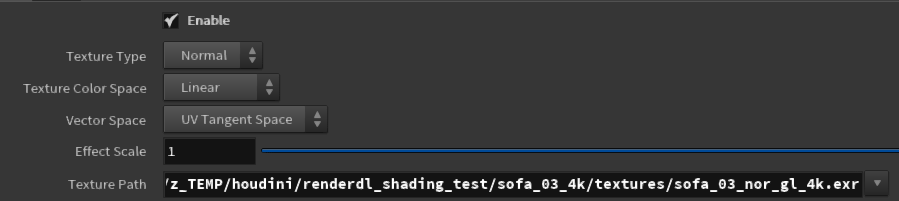
We also need to match the color space (linear) and vector space (UV Tangent Space).

Drop down a displacement node.
Use the normal map as vector displacement
connect out displacement to disp_normal_bump_value in the dlPrincipled shader.
Repeat the process for the fringe shader. The easiest thing to do is to copy and paste the 3delight network and change the name of the referenced node. You should end up with something that looks like this.

Attach 3delight shaders to the sofa
Navigate over to the gltf mesh. You will notice that the mesh has a shop_materialpath attrib on the prims. Let's use these pre-existing attributes to split the mesh and attache the 3delight shaders.
Object merge the gltf sofa in a new geometry container. The gltf object will not render.
Copy all the materials in /mat or create a new material network
Separate the sofa from the fringe mesh by using shop_materal path attrib
Append a material node after each blast and source the appropriate materials.
Merge geometry back together.
Create an environment light.
Create a 3delight node in /out
Render
Initial Test Render with 3delight
3delight automatically renders all visible objects.
A new camera will be created if you don't already have one.
If you do not have a light, the render will be black.
I-display is 3delight's native frame buffer. It's good, get used to it.
3delight will auto convert your ALL textures to .tdl files for optimization purposes. Your first render may take a little longer than usual from the conversion process.
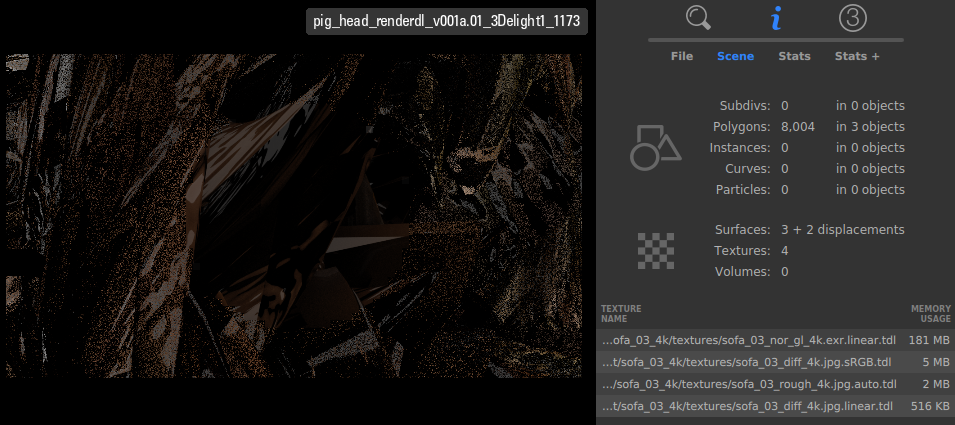
My inital render looks like this hot mess. That's ok, I still consider this a success. You can see the converted textures on the right side. My render is detecting 3 surfaces + 2 displacements and 4 textures. To fix this issue, I just need to lower the displacement value to taste.
With some minor tweaking on the displacement values, I was able to render the sofa properly. Copy/paste relative references on the displacement nodes to make your life easier.


Megascan Rock - Displacement Mapping
The next task it to render Quixel Megascan assets. The easiest way to import this stuff is to use Quixel Bridge. Once installed, you'll see Megascans in the Houdini menu.
You will need to log into Quixel Bridge with an Epic Games Account to get all the assets for free. Subscriptions are available for commercial use.
The setup is the same, rebuild the 3delight principled shader using the principled shader that came with the megascan. This time around, the asset comes with both a displacement map and a normal map. Assets from Substance Painter will be similar, height maps and normal maps are often exported. In situations like this we need to plug in two textures into the displacement shader.

In this example, I'm using the Nordic Beach Rock Formation.
Assuming you set up everything properly and Houdini is already open, you should be able to send the asset directly from Quixel Bridge.
Pig Dancer - Motion Blur, SSS, Reflect, Refract, Fur & Hair
The pig dancer represents the most common surfaces we render in VFX. An object with motionblur, subsurface scattering, reflection, refraction, sometimes fur and hair.
Packed and Unpacked Prims

All geometry are unpacked at render time. If you mesh has known attributes such as width, pscale or v, uv, then attributes will be passed to 3delight.
Curves, Hair and Fur

You can use dlHairAndFur to shade curves or houdini's fur system (which are also just curves). The only trick is that your curves must have a width attribute.
Geometry and curves can be subdivided at render time by modifying geometry attributes.
Particles
I don't have particles in this example project. They are fairly straight forward to work with. Simply use dlPrincipled Shader. Particles must have a pscale attribute. If you plan to mix curves and particles together at sop level, then particles will need a width attribute as well. Just use wrangle node and use the line below.
@width=@pscale;Pig Dancer Pyro - VDB Grids
In order to render VDB pyro, you must have a through understanding of the grids/vdb you are sending to the renderer. It does not matter what rendering engine you are using, it is important to bind the correct grid to the shader.
Please check back later for more info
3Delight Sign - Geometry Lights and VDB Atmosphere
Geometry lighting with atmospheric fog is where all the trouble begins. It is relatively easy to setup and it is the icing on the cake for this test shot. The issue is that it will dramatically increase render times and create noisy renders.
The only solution to fix it is to increase volume samples quite a bit. I do wish 3delight had a built in denoiser, it would probably help smooth out the renders.
Please check back later for more info
Render Settings
We'll some basics here. If you want more detail it is best to visit the 3delight for Houdini documentation page.
Quality
For the most part you should only adjust the 3 sliders at the top, shading, pixel and volume samples. The numbers will be higher than what you are used to compared to Mantra or Arnold. It is not unusual to go all the way up to 1024 or 2048 samples when aiming for film quality renders. You can think of Pixel samples as brute force quality adjustment.

Volumes are slow to render, it is best to render them separately with matte black geometry, low pixel samples and very high volume samples

Sinc with filter width of 4 looks good just use it.

Scene Elements
This section works the same as the Mantra node. I have not spent much time experimenting with the Atmosphere tab or shader. I've been told that VDBs are more optimised for rendering. You might as well use VDB for atmospheric effects.
Output

The check boxes are a bit strange. You can only select one at a time. It would have been less confusing if this was a drop down menu. The top 3 are fairly straight forward. Use NSI File if you want to render from the terminal.
I'm not a fan of the default naming convention. I prefer name.####.ext
$HIP/render/`$OS`.$F4.exr
$HIP/render/`$OS`.$F4.nsi
Image Layers (AOV)
Use Image Layers to enable AOVs. Multi-light(light passes) has very little effect on render time, you might as well leave it on.
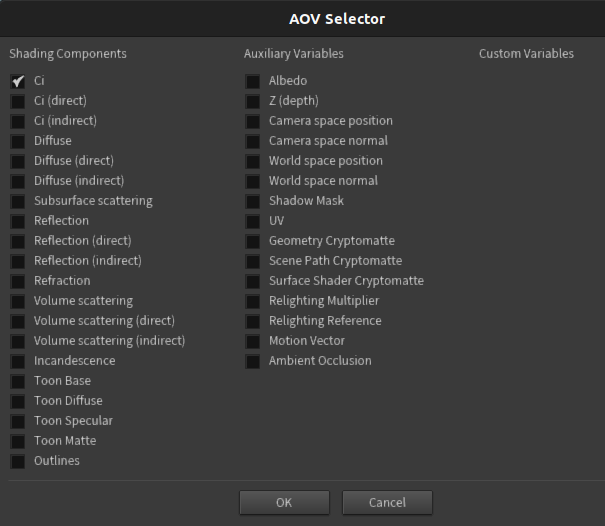
Click on the add button to add pre-defined AOVs or custom AOVs if your shader has any.
Overrides
Use Overrides to temporarily disable features, reduce resolution and samples. Overrides are automatically disabled when you click on the Render Sequence button.

Geometry Attributes

You can modify the way geometry is processed by 3delight at object level. Check the 3delight tab for all available options. For the most part, you will likely only be using Render Polygons as Subdivison
Cloud Rendering

3delight cloud ludacris mode chewing away on a single frame with 1536 cores. Watch the bucket render real time here .
3delight's cloud rendering can help you push out some frames if you are on tight deadline. There's a few things to keep in mind.
I-display determines if you are rendering on your local machine or the cloud.
You can very easily consume render minutes when rendering frame sequences and render layers. Practice with simple geometry and test renders.
Make sure you have fast and reliable internet. Upload speed is very important.
Some people (including myself) are having issues sending frame sequences longer than 50 frames.
Cloud rendering is not a perfect system, air on the side of caution when submitting jobs with heavy caches and geometry. Test render FML (First, Middle, Last).
Optimise your render layers where possible and consider rendering with .nsi files for better stability.
This 200 frame 960x540 sequence was rendered using 3delight cloud. It was hard to keep count of the total accumulated minutes, but it was approximately 8000 minutes and just shy of $200 usd. Most of the slow renders came from rendering atmospheric vdb and pyro. There's faster ways to do this, but I wanted all passes and frames to be done with 3delight cloud. Lens distortion, chromatic aberration, grain and some light color grading were done in Nuke.
Frame sequence cloud rendering
For the most part, everything just worked. Some people including myself had issues rendering frame sequences that are longer than 50 frames. This only happened when submitting large vdb sims. It may be caused by non optimal network and internet connection on my end.
Here's a snippet of idisplay showing my entire sequence rendering on the cloud.


Project Files
I have provided cache files and EXRs for frames 1001, 1100 and 1200. You can of course cache and render everything yourself. Maybe try changing the sign, animation and props in the scene.
Download entire project here: 3delight_for_houdini.zip

Comments